
Authored by the engineering team at MisolTap. Since our founding in 2005, MisolTap has established itself as a leading Chinese manufacturer of high-performance thread cutting tools. We integrate R&D, production, and global sales into a seamless operation, providing our clients with robust and precise threading solutions tailored to modern manufacturing needs.
In the highly exact field of metalworking and mechanical engineering, the ability to securely fasten components together relies entirely on the structural integrity of internal threads. Whether you are fabricating aerospace components, automotive engine blocks, or custom industrial machinery, executing the precise steps to tap a thread in metal is a fundamental skill that cannot be compromised. An incorrectly tapped hole will lead to stripped threads, broken fasteners, and catastrophic mechanical failures that halt production and inflate manufacturing costs.
From our experience supplying the global manufacturing sector, many operators—both novice and veteran—often overlook the crucial nuances involved in internal threading. The process is not merely about forcing a tool into a drilled hole; it is a calculated operation of material removal, chip evacuation, and friction management. To tap a thread in metal successfully, one must understand the metallurgy of the workpiece, the geometry of the cutting tool, and the physics of the cutting action itself.
In this comprehensive technical manual, we will outline the definitive, industry-standard steps to tap a thread in metal. We will explore tool selection, pre-drilling calculations, lubrication strategies, and proper manual and CNC execution. By following these meticulously detailed procedures, you will achieve clean, perfectly formed threads that meet the highest international engineering tolerances.
Table of Contents
- 1. Understanding the Fundamentals of Internal Threading
- 2. Step 1: Selecting the Correct Thread Tap
- 3. Step 2: Calculating and Selecting the Tap Drill Size
- 4. Step 3: Drilling and Chamfering the Workpiece
- 5. Step 4: Applying Proper Cutting Fluid
- 6. Step 5: Executing the Steps to Tap a Thread in Metal
- 7. Step 6: Cleaning and Thread Inspection
- 8. Leveraging MisolTap Professional Threading Solutions
- 9. Summary Table: The Tapping Process at a Glance
- 10. Frequently Asked Questions (FAQs)
- 11. Industry References
1. Understanding the Fundamentals of Internal Threading
Before executing the physical steps to tap a thread in metal, it is vital to understand what the process actually entails. Tapping is a machining process where a specialized rotary cutting tool, known as a tap, is driven into a pre-drilled hole to carve internal threads (nut threads) into the metal. The tap features a threaded profile with longitudinal grooves called flutes. These flutes serve two critical purposes: they create the sharp cutting edges required to shear the metal, and they provide an evacuation channel for the swarf (metal chips) generated during the cut.
When you prepare to tap a thread in metal, you must account for the hardness and ductility of the material. Tapping aluminum, for instance, produces long, stringy chips that can easily clog the flutes, whereas tapping cast iron produces short, brittle chips. Understanding your material dictates the type of tap you select and the cutting fluid you apply.
2. Step 1: Selecting the Correct Thread Tap
The first and most critical of the steps to tap a thread in metal is tool selection. Using an inappropriate tap geometry for your specific application will almost certainly result in tool breakage or deformed threads. Taps are generally classified into three primary chamfer types based on the taper at their cutting end:
- Taper Taps: These taps have a pronounced chamfer over 7 to 10 threads. The gradual taper distributes the cutting force over a larger area, making it easier to start the thread perfectly straight. We recommend taper taps for starting difficult holes or for tapping through-holes in hard metals.
- Plug Taps: Featuring a chamfer over 3 to 5 threads, plug taps are the most common industrial standard. They offer a balance between starting ease and the ability to cut threads relatively close to the bottom of a blind hole. When you need to quickly tap a thread in metal for general purposes, the plug tap is your primary tool.
- Bottoming Taps: With a chamfer of only 1 to 1.5 threads, a bottoming tap is designed exclusively to cut threads all the way to the very bottom of a blind hole. You must never use a bottoming tap to start a new thread, as the lack of taper makes alignment nearly impossible and greatly increases the risk of snapping the tool.
Furthermore, international manufacturing standards dictate the precise shank and square drive dimensions of the taps. At MisolTap, we manufacture specialized tools to meet global compliance, including the IOS-529 Thread Tap, the DIN371 Thread Tap for metric applications with reinforced shanks, and the JIS Thread Tap tailored for Japanese industrial specifications. Selecting a tap that aligns with your machine’s collet standard is non-negotiable for rigid tapping operations.
3. Step 2: Calculating and Selecting the Tap Drill Size
You cannot successfully tap a thread in metal if the pre-drilled hole is the wrong diameter. If the hole is too large, the internal threads will be shallow and strip easily under load. If the hole is too small, the volume of material the tap must remove becomes excessive, leading to massive friction, heat buildup, and inevitable tap breakage.
From our experience, calculating the precise tap drill size is mandatory. For metric threads, the formula is remarkably straightforward: Drill Size = Tap Outer Diameter – Thread Pitch. For example, to tap an M8 x 1.25 thread, you subtract 1.25 from 8, resulting in a tap drill size of 6.75mm. For optimal strength and tool life, the industry standard aims for a thread engagement of 75 percent. Always consult a certified machinist’s tap drill chart before proceeding to the next steps to tap a thread in metal.
4. Step 3: Drilling and Chamfering the Workpiece
Once you have selected the correct drill bit, secure your workpiece firmly in a heavy-duty vise. Any lateral movement during drilling or tapping will cause the tool to bind and snap. Mark the hole location using a center punch to prevent the drill bit from wandering across the metal surface. Drill the hole ensuring absolute perpendicularity to the workpiece surface. If utilizing a drill press or a CNC mill, this vertical alignment is guaranteed; if using a hand drill, we recommend employing a drill block or guide.
After the hole is drilled, you must chamfer the top edge using a countersink bit. The chamfer should be slightly larger than the major diameter of the tap. Chamfering serves a dual purpose: it removes the raised burr created by the drill, and it provides a smooth, guided entry funnel for the tap, ensuring it starts squarely. Skipping the chamfering phase is a common mistake that disrupts the steps to tap a thread in metal, often leading to cross-threading.
5. Step 4: Applying Proper Cutting Fluid
Friction is the ultimate enemy when attempting to tap a thread in metal. The cutting edges of the tap generate intense heat as they shear the material, and without proper lubrication, the metal chips can actually weld themselves back onto the tap flutes—a phenomenon known as built-up edge (BUE). This destroys the thread profile and shatters the tool.
We recommend heavily applying a specialized tapping fluid or cutting oil to both the tap and the internal walls of the drilled hole. The type of fluid depends entirely on the metal being tapped. For steel and stainless steel, highly active sulfurized cutting oils are required to prevent galling. For aluminum, specialized aluminum cutting fluids or even kerosene blends prevent the gummy chips from adhering to the tool. Never attempt to tap a thread in metal dry, unless you are working with specific self-lubricating materials like cast iron or brass.
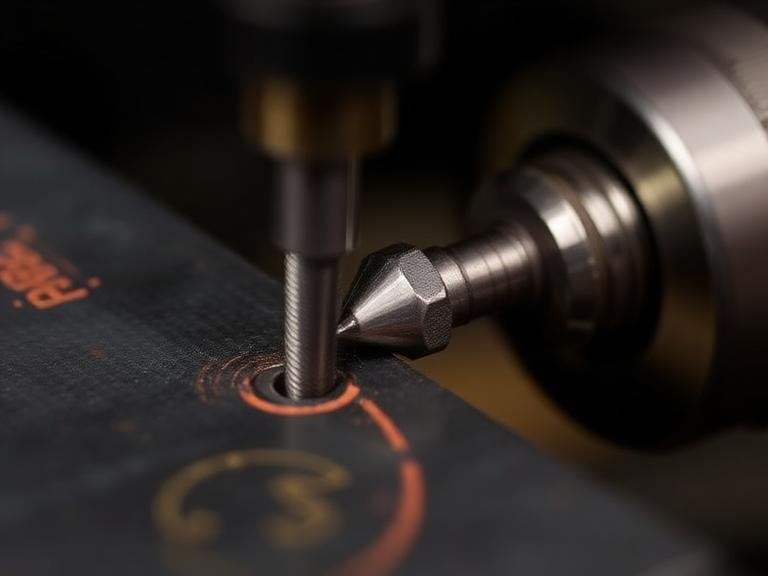
6. Step 5: Executing the Steps to Tap a Thread in Metal
With the hole prepped and lubricated, you are ready to physically tap a thread in metal. Secure the square end of your chosen tap into a high-quality tap wrench. Position the tip of the tap squarely into the chamfered hole. Maintaining downward pressure to help the first cutting threads bite into the metal, slowly turn the tap wrench clockwise (for standard right-hand threads).
It is imperative that the tap remains perfectly perpendicular to the workpiece during the first three full rotations. Use a machinist square placed against the shank of the tap to verify vertical alignment from two 90-degree angles. If the tap begins at an angle, reverse it out immediately and restart; correcting a crooked tap mid-cut is impossible.
Once the tap has engaged the metal securely, the downward pressure is no longer necessary; the threads will pull the tool forward. From our experience, the most critical technique to safely tap a thread in metal is the “peck tapping” method. For every half-turn you advance the tap into the material, reverse the tap a quarter-turn counterclockwise. You will hear and feel a distinct “snap.” This backward motion breaks the metal chips forming in the flutes, preventing them from curling up, jamming the tool, and causing a fracture. Continue this alternating forward-and-backward process until the tap has reached the desired depth or passed completely through the workpiece.
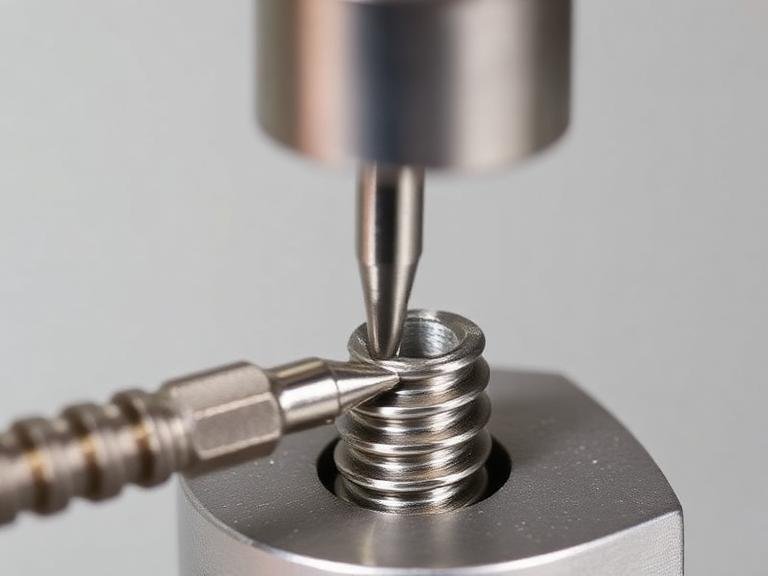
7. Step 6: Cleaning and Thread Inspection
The final steps to tap a thread in metal involve safe tool extraction and quality verification. Once the threads are cut, carefully reverse the tap out of the hole entirely. Do not forcefully yank the tap, as the newly cut threads are easily damaged. Use compressed air (while wearing safety glasses) to blast all remaining swarf, cutting fluid, and debris out of the hole.
Inspect the internal threads using a high-lumen inspection flashlight. The threads should appear sharp, uniform, and free of any torn material or galling. For industrial applications, we recommend verifying the tolerance of the tapped hole using a Go/No-Go thread gauge. A perfectly tapped hole will allow the “Go” end of the gauge to thread in smoothly by hand, while the “No-Go” end should not enter more than two full turns.
8. Leveraging MisolTap Professional Threading Solutions

Achieving absolute precision when you tap a thread in metal is impossible without utilizing premium-grade cutting tools. Since our founding in 2005, MisolTap has established itself as a leading Chinese manufacturer of high-performance thread cutting tools. We integrate R&D, production, and global sales into a seamless operation, providing our clients with robust and precise threading solutions tailored to modern manufacturing needs.
Our product lineup is engineered from superior High-Speed Steel (HSS) and advanced carbide substrates, featuring specialized physical vapor deposition (PVD) coatings to withstand extreme temperatures and prolong tool life. Whether your operational standard requires the IOS-529 Thread Tap for international compatibility, the robust DIN371 Thread Tap for heavy-duty metric machining, or the precision-ground JIS Thread Tap for specific Asian manufacturing requirements, MisolTap provides the exact geometry required to execute flawless internal threading.
9. Summary Table: The Tapping Process at a Glance
To assist your machining operations, we have consolidated the essential steps to tap a thread in metal into a rapid reference table.
| Process Step | Action Required | Crucial Engineering Consideration |
|---|---|---|
| 1. Tool Selection | Select Taper, Plug, or Bottoming tap. | Ensure the tap standard (e.g., DIN371 Thread Tap) matches the required specification and hole type. |
| 2. Drill Calculation | Calculate: Drill Size = Tap OD – Pitch. | Aim for 75% thread engagement to balance strength and prevent tool breakage. |
| 3. Hole Preparation | Drill perpendicular and chamfer the edge. | The chamfer removes burrs and ensures the tap starts squarely. |
| 4. Lubrication | Apply material-specific cutting oil. | Never tap dry. Lubrication prevents chip welding and reduces extreme friction. |
| 5. Tapping Execution | Advance half a turn, reverse quarter turn. | Reversing breaks the chips. Keep the tap perfectly perpendicular to the workpiece. |
| 6. Inspection | Clean with compressed air; use a thread gauge. | Verify the tolerance using Go/No-Go gauges for critical industrial applications. |
10. Frequently Asked Questions (FAQs)
Why does my tap keep breaking when I try to tap a thread in metal?
From our experience, tap breakage is primarily caused by three errors: failing to reverse the tap to break the chips (clogging the flutes), using an incorrectly undersized tap drill bit, or applying lateral pressure instead of keeping the tap wrench perfectly perpendicular. Lack of high-quality cutting fluid also contributes to sudden tool failure.
Can I use a power drill to tap a thread in metal?
While CNC machines and specialized tapping arms are designed for powered tapping, using a standard handheld power drill to tap a thread in metal is highly discouraged. Hand drills lack the rigid stability and precise torque control required, almost guaranteeing that the tap will snap inside the hole.
What is the difference between the IOS-529, DIN371, and JIS Thread Taps?
These designations refer to international dimensional standards for the tap’s shank diameter and driving square size. For example, a DIN371 Thread Tap features a reinforced (thicker) shank designed to withstand high torque in metric applications, while the JIS Thread Tap conforms strictly to Japanese Industrial Standards used widely in automotive manufacturing.
Do I need to clean the hole before I tap a thread in metal?
Yes, absolutely. Any residual metal chips or hardened debris left over from the drilling process can wedge against the cutting edges of the tap. We recommend blowing the blind hole out with compressed air prior to applying your cutting fluid and beginning the tapping process.